


The Node.js selector allows you to easily set up Node.js applications with the cPanel graphical interface.
Some Definitions:
You should change these values to match the values required for your account and application.
- app: is used as an example for the application root directory and application uri
- example: is used as example for the username
- example.com is to illustrate the domain
- app.js is used as example for the application startup file
- My app will be used as the description
- 10 or 11 are the node.js versions
Setting up the NodeJs app:
To set up a Node.js application using cPanel, follow the steps below.
Step 1 - Create the application:
1. First, you need to login to cPanel.
For help in accessing cPanel, click on this Link
2. In the SOFTWARE section of cPanel, click the Setup Node.js App icon to open the Node.js selector:
3. On the Node.js selector page, click CREATE APPLICATION to start the application setup:
![]()
4. Fill in the fields on the application setup form:
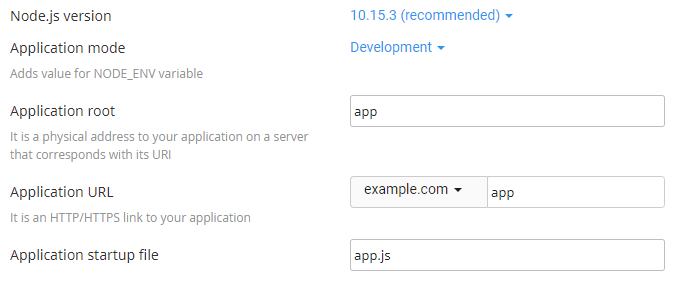
- Node.js version: select your preferred version from the drop down list
- Application mode: choose Development or Production from the list. Development may be chosen initially and changed to production later.
- Application root: the file system location for application files. The entry will be appended to /home/username to form the complete path to the application files in the cPanel home directory.
Typical locations for the application root are
/home/username/appnameor/home/username/apps/appname. Do not put the application root inside the domain document root.
- Application URL: the address of the application to be accessible from the Internet.
When you define routes in your application code, you must include the application URL in the route.
- Application startup file: the initial file that will be processed when launching the application.
5. When you're happy with your settings. click on CREATE:
![]()
6. The app should start automatically if you setup everything correctly. Click on OPEN to view the test page.
Step 2 - Create the package.json file:
Follow these steps to create the package.json file:
1.from cPanel open the File Manager:
![]()
2. From the directory tree on the left, find and click on the application root folder (you should have already specified this in the steps above):
3. Find and click +File icon to create a new file:
![]()
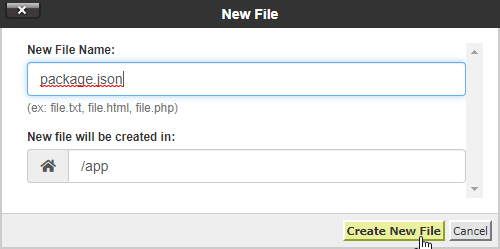
4. In the New Filedialog box, type the filename package.json, and then click Create New File:
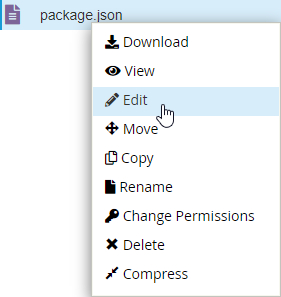
5. Right-click or secondary click on the package.json file in the right-hand column of File Manager and then click Edit. An edit dialog box may appear (click OK to proceed to the Editor):
6. In the Editor screen, you should have something like the example below in the package.json file (modify according to your app):
{"name": "app","version": "1.0.0","description": "My App","main": "app.js","scripts": {"test": "echo \"Error: no test specified\" && exit 1"},"author": "John Doe","license": "MIT"}
7. Click Save Changes to save the file:
![]()
8. Click Close to close the editor.
Step 3 - Installing npm:
1. In the SOFTWARE section of cPanel, click on the Setup Node.js App icon to open the Node.js selector:
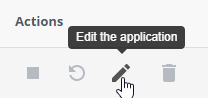
2. In the Actions column of the Web Applications list, click the pencil icon to edit the application:
3. Click Run NPM Install:
![]()
4. The NPM installation runs and displays a success indicator if you have everything setup correctly:


